You will often hear about SMT peripheral equipment when you start working with printed circuit boards. These tools help you move, check, and assemble PCBs with greater care and speed. Good equipment boosts first pass yield, meaning more boards pass inspection the first time, which reduces rework and scrap. The table below shows how collecting data from your equipment can reveal ways to improve your process and keep your production line running smoothly.
| Data Collection Points | Impact on PCB Assembly Efficiency and Yield Rates |
| ———————————————————————————————————– | ————————————————————————————————————————– |
| Equipment Performance Data | Identifies patterns of inefficiency and maintenance needs, improving uptime and throughput. |
| Production Yield Data | Allows for precise yield percentage calculations, helping to identify stages with yield losses. |
| Defect Type and Frequency Data | Helps in identifying root causes of defects, enabling targeted corrective actions. |
| Environmental Data | Correlates environmental conditions with defect rates, allowing for adjustments to maintain optimal production conditions. |
With this Beginner’s Guide, you can learn how to choose and care for the right SMT tools to make your assembly process better.
Key Takeaways
- SMT peripheral equipment is essential for efficient PCB assembly. It helps move, inspect, and clean boards, ensuring a smooth production process.
- Data collection from equipment can improve assembly efficiency. Tracking performance, yield, and defect types helps identify areas for improvement.
- Choosing the right SMT tools is crucial. Assess your production needs and budget to select equipment that matches your goals and can grow with your business.
- Regular maintenance and cleaning of equipment extends its life. Follow a routine to keep machines running smoothly and prevent costly downtime.
- Start small when beginning SMT assembly. Test processes with a few boards, learn from mistakes, and gradually scale up your production.
Beginner’s Guide to SMT Peripheral Equipment
What is SMT Peripheral Equipment?
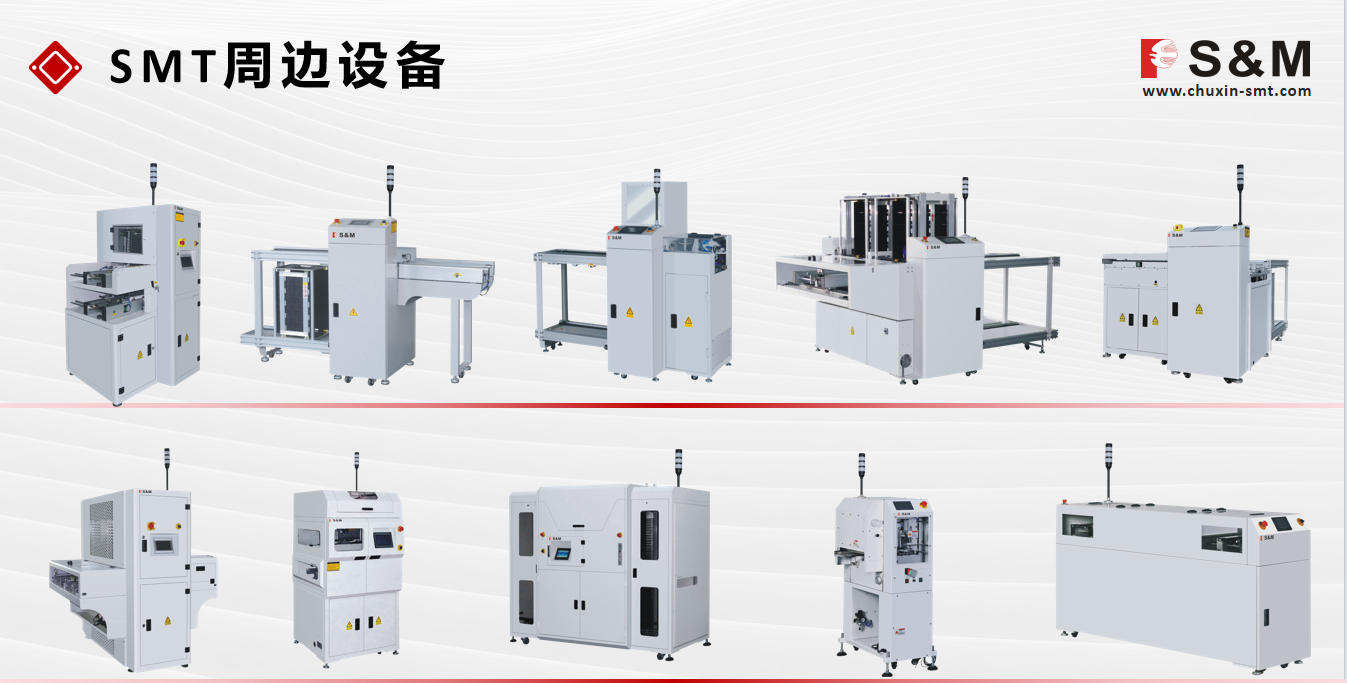
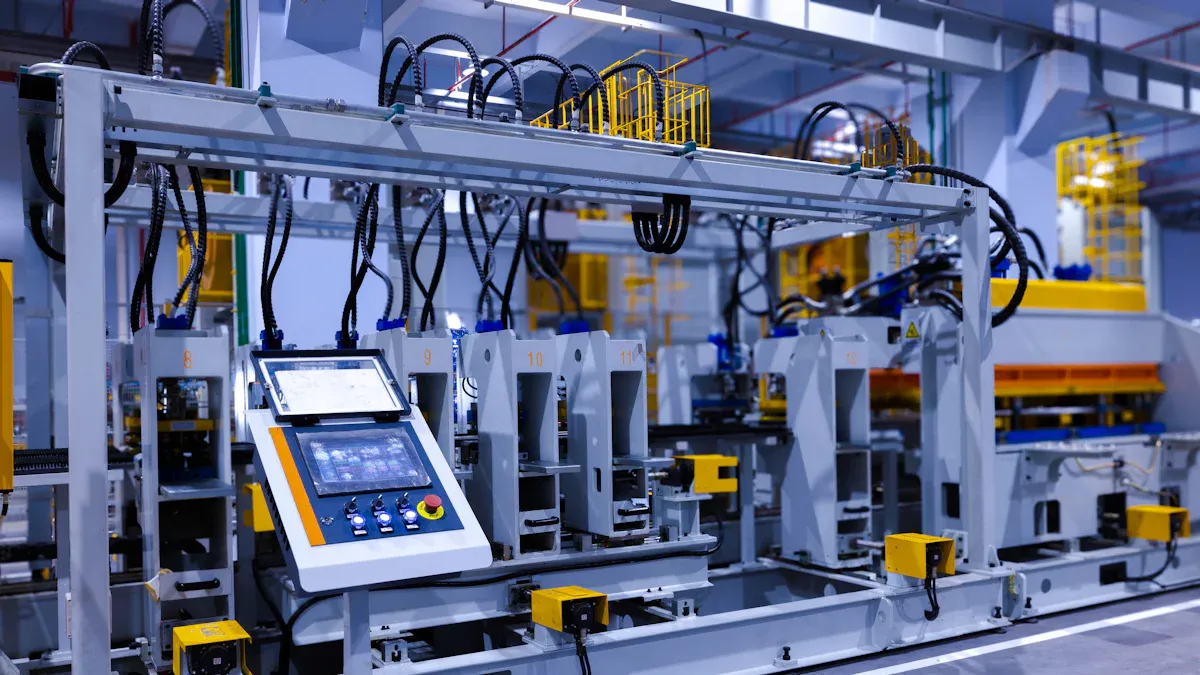
SMT peripheral equipment includes the machines and tools that support the main steps of surface mount technology assembly. You use these devices to move, prepare, inspect, and finish printed circuit boards (PCBs) during production. These tools do not place components or solder them directly, but they make sure each board moves smoothly from one stage to the next.
You will find several common types of SMT peripheral equipment in modern electronics manufacturing:
- PCB loader and unloader: These machines feed boards into the line and remove them at the end.
- PCB conveyors: They transport boards between machines, keeping the process steady.
- Vertical buffers: These store boards temporarily to prevent line stoppages.
You also use other equipment like SMT printers for solder paste, inspection machines for quality checks, and depaneling machines to separate finished boards.
Why Are They Important?
You need SMT peripheral equipment to keep your assembly line running efficiently. These tools help you handle PCBs safely, reduce manual labor, and improve the quality of your finished products. For example, PCB loaders and unloaders automate the start and end of the process, which saves time and lowers the risk of damage. Conveyors keep boards moving at the right speed, so each machine works at its best.
Tip: Automation through loaders, unloaders, and buffers helps you avoid production delays and ensures a smooth workflow.
Here is how SMT peripheral equipment supports the process flow:
- PCB loader feeds boards into the line.
- SMT printer applies solder paste with precision.
- Inspection machines check for paste quality and placement.
- Conveyors move boards between each step.
- Unloaders sort finished boards based on inspection results.
With the right SMT peripheral equipment, you can boost production speed, improve assembly quality, and make your workflow more reliable. This Beginner’s Guide helps you understand why these tools matter and how they fit into your assembly process.
Main Types of SMT Peripheral Equipment

Solder Paste Printer
A solder paste printer is the first machine you use in the SMT assembly line. This equipment applies solder paste onto the PCB through a stencil. The printer uses a squeegee to spread the paste evenly, making sure each pad gets the right amount. You can fine-tune the stencil design and adjust the squeegee pressure for better results. Automation features help you control the process with high precision. Many printers now include optical inspection systems to check the quality of the paste application in real time.
| Feature/Metric | Description |
| ————————— | ———————————————————————————- |
| Automation Features | Automated control for precise solder paste application. |
| Printing Process Components | Stencil, squeegee, and solder paste properties affect quality. |
| Optimization Techniques | Stencil design and squeegee pressure adjustments improve printing. |
| Performance Metrics | Precision, speed, and reliability, with some models offering real-time monitoring. |
| Quality Control Mechanisms | Optical inspection and feedback loops maintain high standards. |
Tip: A well-calibrated solder paste printer helps you avoid defects later in the process.
Pick and Place Machine
The pick and place machine is the heart of your SMT line. This machine automatically picks up surface-mount components and places them onto the PCB with great speed and accuracy. You can choose from different models based on your production needs. Some machines, like the Hanwha Decan S2, can place up to 92,000 components per hour with high precision. Others, like the MY300DX, work well for smaller batches and offer flexible tape cutting.
| Machine Type | Placement Speed (CPH) | Accuracy |
| ———————— | ——————— | —————— |
| Rapid Placement Machines | Up to 53,000 | Not specified |
| MY300DX | 40,000 | 21μm IPC 9850 |
| Hanwha Decan S2 | 92,000 | ±25 μm @ Cpk ≥ 1.0 |

You should select a pick and place machine that matches your production volume and accuracy requirements.
Reflow Oven
After placing components, you need a reflow oven to solder them in place. The reflow oven heats the PCB in several stages:
- Preheat Stage: Raises the temperature slowly to remove moisture.
- Soak Stage: Holds the temperature steady for flux activation and even heating.
- Reflow Stage: Reaches peak temperature to melt the solder paste and form strong connections.
- Cooling Stage: Lowers the temperature to solidify the solder joints and prevent stress.
A good reflow oven lets you control each stage carefully. Some models use nitrogen to reduce oxidation, which improves solder quality and reduces defects.
Note: Proper temperature control in the reflow oven is key to reliable solder joints and fewer assembly problems.
PCB Loader & Unloader
PCB loaders and unloaders automate the start and end of your SMT line. The loader feeds blank PCBs into the assembly line, while the unloader collects finished boards. These machines reduce manual handling, which lowers the risk of damage and speeds up production. Modern loaders and unloaders can process up to 10 boards per minute and integrate smoothly with other SMT equipment.
| Functionality | Contribution to Automation and Throughput |
| ———————- | ——————————————————– |
| PCB Loaders | Feed blank PCBs into the line, reducing manual handling. |
| PCB Unloaders | Organize and stack finished PCBs, minimizing damage. |
| Integration | Connect stages of production, reducing bottlenecks. |
| High-volume Production | Operate continuously for maximum throughput. |
You will find that using loaders and unloaders can increase your production rates by up to 50% compared to manual methods.
Conveyor System
Conveyor systems move PCBs between machines in your SMT line. You can choose from several types:
- PCB Belt Conveyor: Transfers boards accurately and reliably.
- Inspection Conveyor: Lets you check boards during assembly.
- Slat Chain Conveyor: Handles delicate or oddly-shaped boards.
- Link Conveyor: Provides a stable platform for precise transport.
- Buffer Conveyor: Temporarily stores boards to prevent bottlenecks.
- Turn Conveyor: Changes the direction of board flow for smooth transitions.
A well-designed conveyor system increases throughput, improves placement accuracy, and reduces the risk of PCB warpage. You should select the right conveyor type to match your production needs and keep your SMT line running smoothly.
Inspection Equipment
Inspection equipment helps you catch defects early and maintain high quality. You will use several types of inspection tools:
| Equipment | Detection Capabilities |
| ——— | ——————————————————————- |
| SPI | Checks solder paste thickness, area, and offset. |
| AOI | Finds missing components, insufficient solder, and false soldering. |
| X-RAY | Examines internal structures and hidden solder joints. |
| ICT | Measures electrical properties and detects open or short circuits. |
You should use inspection equipment at different stages to ensure every board meets your quality standards.
Cleaning & Repair Tools
Cleaning and repair tools help you maintain assembly quality and fix problems. An SMT rework station lets you repair or replace faulty components without damaging the board. These stations often include hot air tools, soldering irons, and sometimes infrared heating. You can use them for delicate work on fine-pitch parts like QFN or BGA packages.
To keep your boards clean and reliable, you should:
- Choose the right cleaning methods and materials.
- Optimize cleaning process settings.
- Use proper drying techniques.
- Apply conformal coatings with the right thickness and coverage.
- Make sure coatings cure properly.
Tip: Regular cleaning and careful repairs help you avoid defects and extend the life of your products.
This section of the Beginner’s Guide gives you a clear overview of the main SMT peripheral equipment. You can now see how each tool fits into the assembly process and supports efficient, high-quality production.
SMT Process Flow

PCB Handling
You start the SMT process by handling PCBs with care. Proper handling prevents damage and keeps your boards clean. Always use lint-free gloves and the right tools. Never use too much force when placing or removing stencils. Train your team to follow these steps:
- Use gloves and proper tools to avoid contamination.
- Avoid pressing hard on stencils or boards.
- Store stencils in dedicated racks or cabinets.
- Keep the environment clean and dry.
- Protect stencils with anti-static covers.
- Clean stencils after every use and inspect for damage.
Tip: Careful handling at this stage helps you avoid defects later in the process.
Solder Paste Application
You apply solder paste to the PCB using methods like screen printing, jet dispensing, or direct ink writing. Solder paste acts as both an adhesive and a conductor. Even small mistakes in the application can cause defects that affect the board’s function. Make sure you use the right amount and check for even coverage.
- Screen printing is the most common method.
- Jet dispensing works well for small or complex areas.
- Direct ink writing offers flexibility for prototypes.
Note: Proper solder paste application is key to strong, reliable solder joints.
Component Placement
You use a pick and place machine to put components on the board. The accuracy and speed of this step depend on several factors. Check the table below for details:
| Factor | Impact |
| —————————- | ——————————————————————————————————————————————————————— |
| Soldering Quality | Misplacement by 0.05 mm can raise defects by 30%. |
| Electrical Performance | A 0.2 mm shift can change impedance by 5-10 ohms. |
| Mechanical Stability | Misaligned parts may fail under stress. |
| Machine Calibration | Good calibration keeps accuracy within 0.01 mm. |
| Design for Manufacturability | 0.3 mm spacing reduces misalignment risk. |
| Component Grouping | Grouping cuts errors by 15% and speeds up assembly. |
| Feeder Setup | Poor setup causes 25% of placement errors. |
You improve placement by calibrating machines, grouping similar parts, and setting up feeders correctly.
Soldering & Reflow
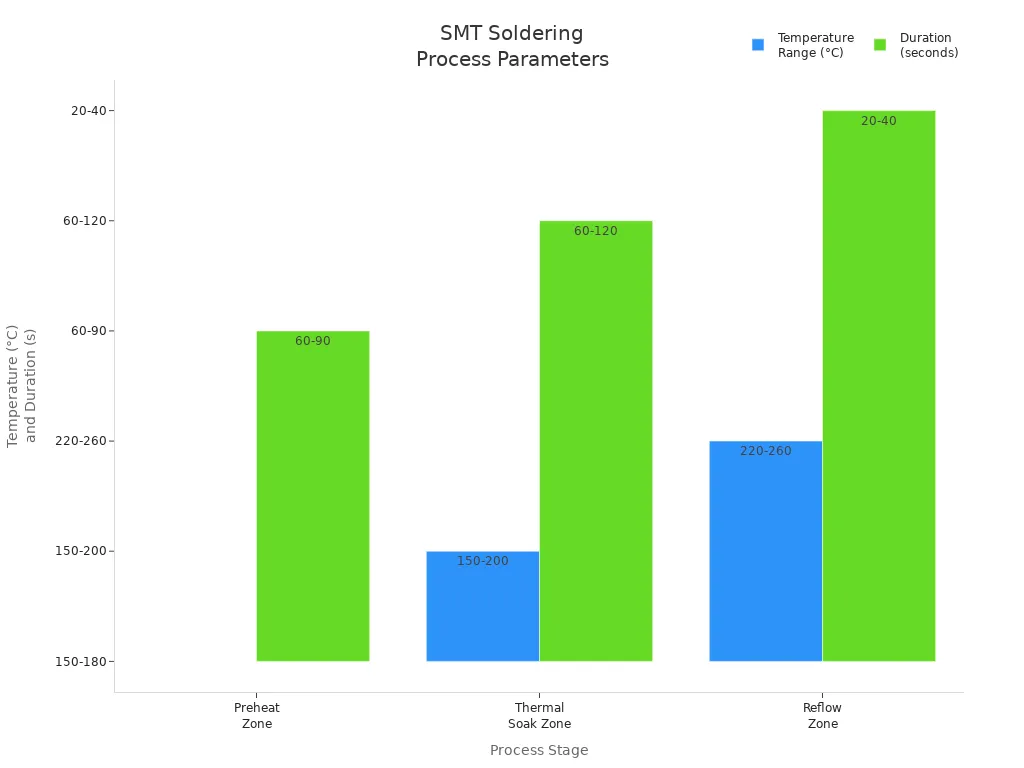
You solder components using a reflow oven. The oven heats the board in four main stages. Each stage has a specific temperature and time. See the chart below for a visual guide:

- Preheat Zone: 150-180°C for 60-90 seconds. This step evaporates solvents and activates flux.
- Thermal Soak Zone: 150-200°C for 60-120 seconds. The board heats evenly and prepares for soldering.
- Reflow Zone: 220-260°C for 20-40 seconds. The solder melts and forms joints.
- Cooling Zone: Controlled cooling prevents stress and cracks.
Proper temperature control keeps components safe and ensures strong solder joints.
Inspection & Quality Control
You check your boards for defects using several inspection methods. Each method finds different types of problems. The table below shows common inspection tools:
| Inspection Method | Description |
| ——————————————————————————————————— | ———————————————————————————- |
| Automated Optical Inspection (AOI) | Uses cameras to spot mounting and soldering errors quickly. |
| X-ray Inspection | Looks inside hidden joints, such as under BGAs, to find bubbles or missing solder. |
| In-Circuit Testing (ICT) | Checks electrical connections for faults. |
| Functional Testing | Simulates real use to make sure the board works. |
| Manual Visual Inspection | Lets you find small defects that machines might miss. |
| Flying Probe Testing | Tests parts and connections without special fixtures. |
| Solder Paste Inspection (SPI) | Confirms correct solder paste application before reflow. |
- Early detection of defects saves time and money.
- Good inspection improves yield and product reliability.
- Data from inspections helps you improve your process.
Quality control at every stage ensures your boards meet high standards and work as expected.
Choosing SMT Peripheral Equipment
Assessing Needs
You should start by understanding your production goals. Define the types of products you want to build and the scale of your operation. Think about the size and complexity of your printed circuit boards. If you plan to assemble boards with many small parts, you need equipment that can handle high assembly density. Look at your process flow and decide which machines fit each step. Make a list of the features you need for each piece of equipment. This approach helps you avoid buying tools that do not match your needs.
Tip: Write down your main requirements before you start shopping for SMT equipment. This step will save you time and money.
Budget & Scalability
Your budget plays a big role in your choices. You must match your financial resources to your production needs. If you have a limited budget, focus on the most essential machines first. As your business grows, you may need to add more equipment. Scalability matters because you want your SMT line to grow with your company. Choose machines that can handle higher volumes if you expect more orders in the future. This way, you avoid replacing equipment too soon.
Note: Many companies start small and expand their SMT lines as demand increases. Plan for growth from the beginning.
Key Features
When you compare SMT peripheral equipment, look for features that match your needs. The table below shows important features to consider:
| Feature | Description |
| ——————— | —————————————————————————————————————————————————————————- |
| Part size | The machine size should match the size of the electronic components. |
| Machine accuracy | High accuracy is vital; 0.0001″ is the standard best accuracy for SMT machines. |
| Machine repeatability | Critical for generating maximum outputs, especially with programmed software. |
| Placement speed | Important feature: IPC9850 is the standard speed for rapid placement machines. |
You should also think about how easy the machines are to use and maintain. Reliable equipment with good support will help you avoid downtime. The Beginner’s Guide recommends checking the cost-performance ratio to get the best value for your investment.
Maintenance Tips
Routine Cleaning
You keep your SMT peripheral equipment running smoothly by following a regular cleaning routine. Clean machines last longer and work better. Here are some important cleaning steps:
- Wipe the SMT nozzle surface with a clean cloth.
- Use fine wire to clear small holes, then blow them out with an air gun.
- Avoid soaking nozzles in harsh chemicals like alcohol.
- Clean the HOLDER cavity with a cotton swab, making sure you use a good filter.
- Apply special grease to HOLDER minions as needed.
- Stick to a regular maintenance schedule that matches your production needs.
For reflow ovens, you should:
- Wipe the oven surface daily with dust-free paper and detergent.
- Check high-temperature chain oil levels.
- Clean the furnace interior.
- Use COOLDOWN mode and vacuum the furnace weekly.
- Add oil to the transmission system monthly.
- Remove dirt from the blower motor every quarter.
- Perform a full check of all components once a year.
Tip: Prepare your cleaning tools in advance. Use a vacuum cleaner, dust-free paper, and safe cleaning agents.
Preventive Checks
You can prevent most equipment failures by checking your machines on a set schedule. Use the table below to plan your checks:
| Maintenance Task | Frequency |
| ————————————————————————————————————— | —————————— |
| Clean and remove dust and debris | Daily |
| Check camera lenses and squeegee condition | Weekly |
| Grease parts and replace vacuum pump filters | Annually/Bi-annually |
| Clean nozzles and check feeder pickup position | Regularly |
| Perform routine checks and calibrations | As recommended by the supplier |
Regular checks help you spot problems early and avoid costly downtime.
Troubleshooting
When problems happen, you need to act fast. Here are common issues and how you can solve them:
- Component Jamming:
- Inspect feeders for debris or misalignment.
- Clean feeders and nozzles.
- Adjust feeder settings and check conveyor alignment.
- Vision System Errors:
- Check lighting and camera focus.
- Clean camera lenses and recalibrate the system.
- Mechanical Failures:
- Look for worn or damaged parts.
- Replace parts and lubricate moving components.
- Software Errors:
- Review programming for mistakes.
- Debug code and update software.
Stay alert for unusual noises or error messages. Quick action keeps your SMT line productive.
Tips for SMT Beginners
Start Small
When you begin with SMT assembly, you should keep things simple. Start with a single board or a small batch. This approach helps you spot problems early and learn from each step. You can use a checklist to guide your first runs:
- Test your process with a small batch before scaling up.
- Inspect your work after each phase to catch errors quickly.
- Make small adjustments instead of forcing solutions.
- Keep extra parts nearby to avoid delays.
- Learn how to use the equipment interface and software controls.
- Write down your assembly steps and settings for future use.
- Always follow safety rules to protect yourself and your workspace.
- Review each run and look for ways to improve.
Tip: Small steps help you build confidence and reduce costly mistakes.
Build Workflow
You can create a smooth workflow by following a few key strategies. Place larger components first, then move to smaller ones. Keep your workspace clean to prevent dust and debris from causing defects. Good lighting helps you see each part clearly. Always check component datasheets for important details. Practice patience and take your time with each step.
A logical order for placing components improves efficiency. Try to keep all SMT parts on one side of the board. Orient components the same way to make assembly easier. Leave enough space between parts to help with testing and repairs. Follow Design for Manufacturing (DFM) guidelines to optimize your layout and avoid problems later.
Avoid Mistakes
Many beginners make the same errors when starting with SMT assembly. You can avoid these common mistakes by following these tips:
- Leave at least 0.8 mm to 1 mm between components to prevent misalignment and solder bridging.
- Double-check your footprints against datasheets to avoid soldering defects.
- Add at least two fiducial marks in the right spots for accurate alignment.
- Use thermal vias and copper pours to manage heat and prevent overheating.
- Design proper solder mask openings and clear silkscreen markings to avoid confusion during assembly.
Note: Careful planning and attention to detail help you avoid costly errors and produce high-quality boards.
You now know how to choose and care for SMT peripheral equipment. Regular maintenance keeps your machines running well. Follow these steps:
- Clean equipment surfaces every day and warm up before use.
- Add oil and check nozzles each week.
- Clean machine heads and check connections monthly.
- Inspect power and repair devices yearly.
If you want to learn more, explore guides on surface mount assembly and overviews of SMT machines. Stay curious and confident as you start your SMT journey. 🚀
FAQ
What is the difference between SMT peripheral equipment and the main SMT machines?
SMT peripheral equipment supports the assembly process. You use these tools to move, inspect, and clean PCBs. Main SMT machines, like pick and place or reflow ovens, handle component placement and soldering.
How often should you clean SMT equipment?
You should clean your SMT equipment daily. Regular cleaning prevents dust buildup and keeps machines working well. Follow the manufacturer’s instructions for best results.
Can you start SMT assembly with just a few machines?
Yes, you can begin with basic machines like a solder paste printer, pick and place, and reflow oven. Add more equipment as your production grows. Start small and expand when needed.
What safety precautions should you follow when using SMT equipment?
Wear gloves and safety glasses. Keep your workspace clean. Follow all machine instructions. Turn off equipment before maintenance. Report any problems to your supervisor.
How do you choose the right SMT inspection equipment?
Tip: Match inspection tools to your board’s complexity.
Use AOI for visual checks, SPI for solder paste, and X-ray for hidden joints. Review your product’s needs before buying.
